ISA500 – ECHOGRAM Transcript
Hi I’m Ben, Managing Director of Impact Subsea and today we’re looking at the ISA500 – ECHOGRAM feature within the ISA500.
Now when you run seaView V3, you’ll be presented with a screen very similar to this one and when you connect your ISA500 to seaView it’ll show up as a tile here. Double clicking on the ISA500 will bring up the ISA500 application.
Within the ISA500 application you’ve got your distance reading, the top left hand corner you’ve got the temperature of the sensor itself, inside the sensor. If you have AHRS enabled in the ISA500 you’ll also have heading, pitch and roll and a 3D model shown on screen. These values will update as the ISA500 is moved so if we move the ISA500 in real time you can see the heading, pitch and roll change along with the 3D model. We also have a turns counter on screen which will count the number of turns of the ISA500 about a specified axis. Below that we have a a graph of distance over time on the screen.
ISA500 – ECHOGRAM Capability
For those with an ISA500 – ECHOGRAM capability; if you navigate to the left hand side of the screen, click on ‘Show Echogram’ if you click on ‘Show Echogram’ it’ll bring up the ISA500 – ECHOGRAM graph and we can adjust the value of that graph.
I’ll just adjust it so its full size on screen just now and what we’re seeing being presented on screen is a graph slowly building up. Now at the moment the ISA500 is set to ping at just 1 Herz so doing one ping per second so the graph is quite slowly building up.
Ping Rate
We can adjust the ping rate of the ISA500. On the left hand side here there’s a ping interval button. If you click that you can select how many times a second the ISA500 should ping. You can select anywhere from 1 Herz to 10 Hertz & maximum. The maximum rate you can ping at will be dependent on the range at which the ISA500 is set over and also the bandwidth of your serial communications. For now we’ll set it to maximum so we’ll get it pinging as quickly as we can so we can see a graph building up a lot quicker on screen just now.
Demonstration in Test Tank
At the moment the ISA500 is just in our test tank behind me here and it’s sitting statically at a set height so we’re just getting quite a a flat line. If we take the ISA500 and move it in the water a little bit and lower it down you can see the the graph representing the lowering of the ISA500, if we rise it back up again you can see the is ISA500 coming back up on screen there. You move it up and down you’ll get a nice sinusoidal graph showing there and again if you just tie it off so it’s sitting there statically you get a flat line again.
Graph Display
On the left hand side you can adjust the the colour of the ISA500 – ECHOGRAM data so we’re using the multicoloured chart just now but you can also use a gold palette or a more blue palette. I’ll leave it on the multicoloured chart for the rest of the demo.
On that graph there you can also adjust the red box, lower part of the colour chart. That is a threshold so if you bring that up it’ll remove the weaker returns and only show you the stronger returns on screen. You bring it down, it’ll show you more and bring it right down to the bottom, it’ll show you every single return there. You can also move the tab at the top this acts as a compression on the color chart and it’ll increase the contrast on screen so you bring that down quite a lot, get a higher contrast image.
Samples Per Ping
On the right hand side of the software application you’ll find an ‘Echogram options’ button. If you click this it’ll bring up a few other options you can tweak. One is the number of lines on the X axis. If this is set to ‘Auto’ it’ll lock the number of lines in the X axis. The number of pixels on screen, in this case 1,492.
The ISA500 has the capability of outputting up to 2,000 samples per ping. That’s the the maximum number you can show on screen at one time. You can disable the auto feature and you can put in a set number of lines or samples to be returned. We can set that to any value from 0 to 2,000 that we want or we put it back to ‘Auto’ it’ll just lock it to the pixels on screen again.
ISA500 – ECHOGRAM Options
There’s a gain here which is purely a software gain so this will adjust the data which is on screen so you may want to tweak this. Turn it up if you’re looking for weaker echoes so you can see them more clearly.
You can also invert the Y axis you can blank the minimum range. If that’s turned off you’ll see the transmission burst of acoustic energy in the ISA500. You turn that on, it just blanks that out so you don’t need to see it.
If smoothing is turned on it’ll give a little bit of interpolation between each ping and just give the data a nicer smoother look. You can also turn on and off the the colour palette if you don’t want to have that showing on the screen.
Demonstration in Test Tank
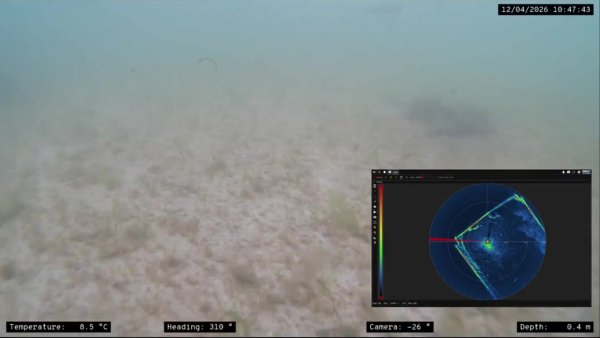
I’ll just give a quick demo, so if we move it up to the highest point you can see the graph there showing a high reading, if we slowly lower it down, you can see that going down there. You can see most of the turns are quite red because we’re getting quite a high energy return off the base of our tank.
If you’re doing this in open water, if you had a stony kind of seabed, you’ll get quite high energy returns. If it’s sand, slightly less energy, if it’s covered in marine growth gets less energy still.
The benefit of ISA500 – ECHOGRAM is you’ll be able to see the marine growth sitting on top of the seabed.
If you wanted a full overview of the ISA500 application, including all ISA500 acoustic settings, check out our ISA500 overview video.
Thank you.
► OUR PRODUCTS ◄
► SUBSCRIBE ◄
► LETS CONNECT: ◄
► GET IN TOUCH ◄
EMAIL: info@impactsubsea.co.uk
PHONE: +44 (0)1224 460 850